A simple bun is the perfect timeless look to rock this holiday season. Whether you're looking for the ideal New Years Eve hairstyle, or an everyday classic bun, our beautiful friend Alex Gaboury is has a new tutorial with three quick and easy updos to try for your next event.
For a how-to on these three simple buns, enjoy the tutorial above, or keep scrolling down for a step-by-step guide on how to recreate each beautiful hairstyle.
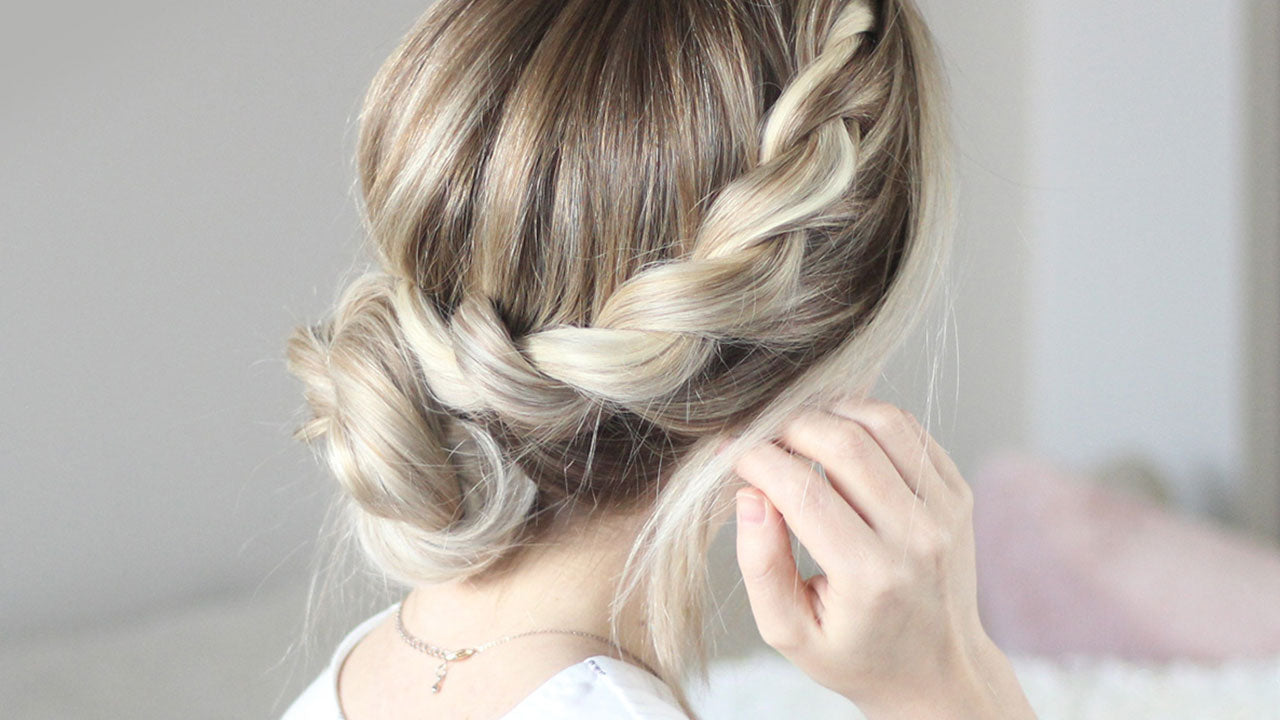
Look #1 - Sophisticated Wrap-Around Bun

This first bun is polished & sophisticated - perfect for classy holiday parties or a black tie New Years Eve event.
Tools Needed:
- Soft bristled brush
- 1 large elastic
- 5-10 bobby pins
- Optional: Luxy Hair extensions

How-To:
1. Use a soft bristled brush to smooth down your hair before tying it off in a tight, low ponytail.
2. To help create a large voluminous bun, take one 4-clip weft of clip-in hair extensions and wrap around the base of the ponytail and clip into place. Depending on your hair type, you are welcome to skip this step or opt for more wefts for even more volume.
3. Now, secure all of your hair (including your extensions) into a ponytail. When you've reached the last loop of the elastic, pull your ponytail through halfway to create a bun. Feel free to make your bun as large or small as you want.
4. Next, grab the ends and gently wrap them around the base of your bun. This will hide the elastic and extensions to create a more polished look. Don't wrap the ends too tightly as you want this part of your bun to appear voluminous and full.
5. If you still have ends left over after doing one wrap around the bun, simply tuck them underneath and secure with bobby pins.
6. Secure the entire bun with some bobby-pins, criss-crossing pairs for extra security.
Look #2 - Rope-Braided Bun

This next bun is unique and fancy - we especially love the rope braid detailing. This whimsical detail makes this bun perfect for both casual holiday affairs or a more fancy night out.
Tools Needed:
- 1 Large elastic
- 1 Small, clear elastic
- 5-10 bobby pins
- Optional: Luxy Hair extensions

How-To:
1. Begin by grabbing a one-inch sized section of hair by your part. You are welcome to leave your bangs down.
2. Clip in a one-clip weft of Luxy Hair extensions, ensuring there is enough hair to cover the clip. Include the hair from the weft in the original section.
3. Create a similar-sized section right below the original one.
4. Twisting each strand, "French" rope braid your hair. Continue to add hair from your hairline to each strand and direct your braid downwards toward your ear. Alex opts for 1-inch strands but you can experiment with smaller strands for a more detailed look, or larger sections for a more effortless and undone appearance.
5. Once you've reached the base of your neck with the rope braid, gather it with the rest of your hair and secure in a tight ponytail with an elastic.
6. Using your index finger and thumb, gently pull on each part of the twist to create more volume.
7. For bun, divide your ponytail in two equal pieces. Tightly wrap these pieces around one another until you've reached the ends. Secure the twisted ponytail with a small, clear elastic so it lasts all night long.
8. Grab the ponytail and wrap it counter-clockwise around itself to create a bun. Make sure to hide tends for a polished look.
9. Secure the bun with bobby pins by crossing two over each other to create an "x". This will ensure the bun is extra secure throughout the night.
Look #3 - French Braid Bun

This third hairstyle is elegant, chic, and surprisingly easy to do. Rock this bun at family get-togethers, holiday dates, or corporate Christmas parties.
Tools Needed:
- 5-10 bobby pins
- 1 hair elastic
- Optional: Luxy Hair extensions
How-To:
1. Gather all of the hair above your temples and section into three equal sections. Cross the left section over the middle section and then the right section over the middle section, creating the first part of a French braid.
2. Add in hair from above your ears and repeat the steps above.
3. Then, add in the remaining hair, and continue the French braid until you reach the base of your head. Tie off this section with a thick hair elastic.
4. Gently tug on the sections of your braid to add extra volume and dimension. Especially if you have darker hair, this step will help each section of the braid to stand out beautifully.
5. To create the bun, wrap your ponytail one full time around itself. Then, take the ends and pull it through the loop you've created, almost as if you were tying a knot. Don't pull it through all the way to maintain the looped appearance.
6. Take any remaining loose ends and tuck them underneath the bun to maintain a polished appearance.
7. Lastly, secure your bun with bobby pins. Slide each bobby pin into a small section of hair and push it towards the middle until it feels secure. Continue all the way around the bun until everything is neatly in place.

Voila, there you have it! Three beautiful and easy-to-create buns that are perfect for New Years Eve, holidays, or any other special occasions.
For more holiday hairstyle inspiration, be sure to check out some looks here, here, and here.
Now that you have your hair done, go have fun bringing in the new year ;)


