PULL A FAST ONE WITH NEW 12 INCH HALO

Psst..we've saved your cart!

But not for long, checkout before it sells out.

← Back
Luxy® Hair  - How to: Double Dutch Braid Hair Tutorial
Braids Hairstyles

How to: Double Dutch Braid Hair Tutorial

The Double Dutch Braid has been a highly trending hairstyle online and offline lately. We can't believe how popular it has become and most importantly, how easy it is to recreate it. In this week's tutorial, Zane will show you how to master the famous double dutch braid.

Video Transcription

Hi, everyone. It's Zane from Luxy Hair today and I'm gonna show you how I create the super popular Double Dutch braid. Now seriously, this hairstyle's been chasing me. I've seen it all over Instagram, on so many celebrity looks.

Today, this morning, when I was coming to work there was three different girls on the train wearing this hairstyle. So it was like a sign that I have to do a tutorial on this. If you want to know how I created this look, then keep on watching. The first thing I'm gonna do is brush through my hair to make sure there is no tangles, as it will make the braiding a lot easier. Now I'm gonna split my hair into two sections. I usually do my parting on one side, but I feel for this hairstyle it's a lot better to do it in the middle as it will part the hair in two equal sections to make sure that there is the same amount of hair on each side.

I'm just gonna brush over again to make sure that the hair is nice and smooth. I'm gonna clip one of the sections away, just to make sure that when I'm braiding this side that I don't take any hairs from this section onto the braid. You might see that I have quite a lot of flyaways. It's just because I washed my hair this morning and, for this reason, I feel that it's actually good to do this hairstyle when you have second or third day hair because it's gonna make the braiding a lot easier. But I'm gonna do my best to work with what I have.

Just grab one section here at the front. This is gonna be the section that we gonna start braiding. Now, divide this section into three equal sections, just like you would with a regular braid. So now we have three strands, we gonna start dutch braiding, so putting each section under the middle one. That's one, the second one under the middle section. Make sure that you're braiding tightly, because it's gonna help you to work with the braid later.

Once you've added the section under the middle section the second time, you're also taking more hair and adding onto this section. Now we're grabbing, again, the left-hand section, putting it under the middle one and grabbing more hair and adding it onto that section. And again, remember to keep it tight. Again, left-hand side section, put it under the middle one and add some more hair. Here, just when you're braiding, just make sure that you braid it quite close to your head so that it doesn't become too loose.

Continue braiding down until there is no more hair to add. I still one more strand. Again, make sure to keep it close to your head. Okay, once there's no more hair to add, I'm just gonna stop here for a second and, as you can see, the braid is quite tight and neat up here. Maybe you have seen from my previous hair tutorials that I like my hairstyles to be a little bit messy and onto bohemian side, so I'm just gonna do the same thing with this hairstyle.

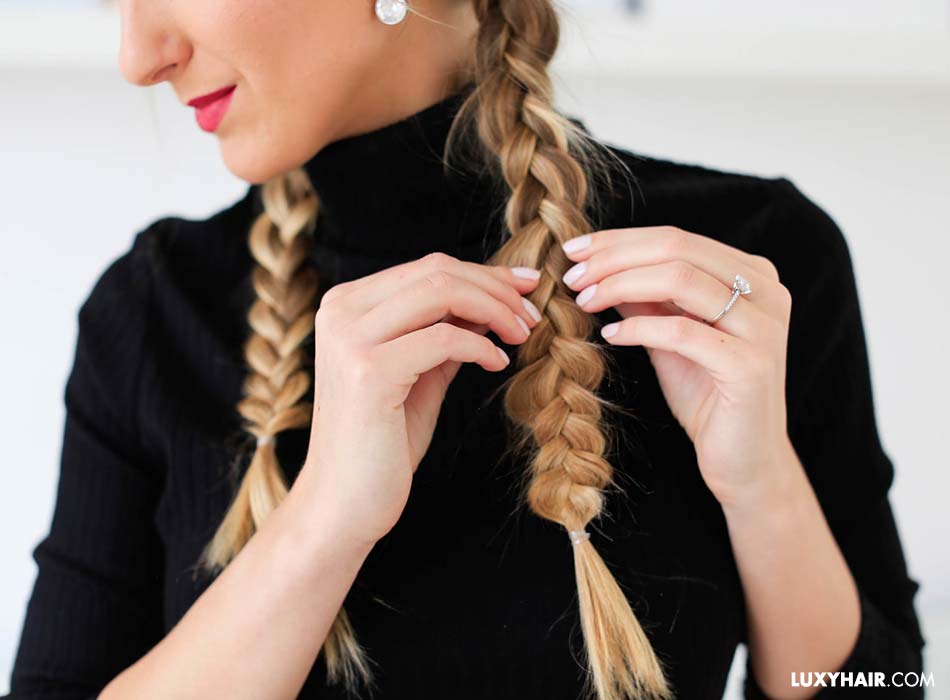
If you like it this way, if you like it more tight, go for it, just continue braiding it down. But, I am gonna stop here and just gonna pull some sections out so that it adds a bit of a messier look and, I guess, the braid is gonna look a bit thicker as well. Once you're happy with it, just continue braiding down. Now I'm just gonna add a clear elastic and I'm gonna do the same thing with this part of the braid as well. I'm just gonna pull out a few sections, not too crazy, just so it appears a little bit thicker. You can always come back to this and just pull out as many sections as you wish. Okay, I think this is good. Okay, now that I'm done braiding this side, I'm just gonna go on to the other one. Again, quickly brush through the hair. Here, again, grabbing one section of the front and let's divide it in three equal sections. Now that we have three equal sections, we can start dutch braiding again. So, placing the side section under the middle section and I'm adding some more hair.

This is where you can control how far or low you want your braid to go. If you want it to be higher, just make sure to braid it a bit more backwards. Again, if you  want it to be a bit lower, then more towards the down side. Again, continue braiding down until you don't have any more hair to grab on. Okay, and this is my last section. I'm just making sure that I'm adding it on, braiding it close to my head again. We gonna stop here and I'm just gonna pull out some sections. Now, my hair today is really silky, so it makes it quite hard to pull the sections out. That's what I meant about having second or third day hair, it would make it a lot easier. Now that I'm finished fanning out my hair, I'm just gonna continue braiding down. Again, secure it with an elastic and pull out some sections. And now, just to make sure that both braids look equal, you can just fan them out more and just do some finishing touches to this look.

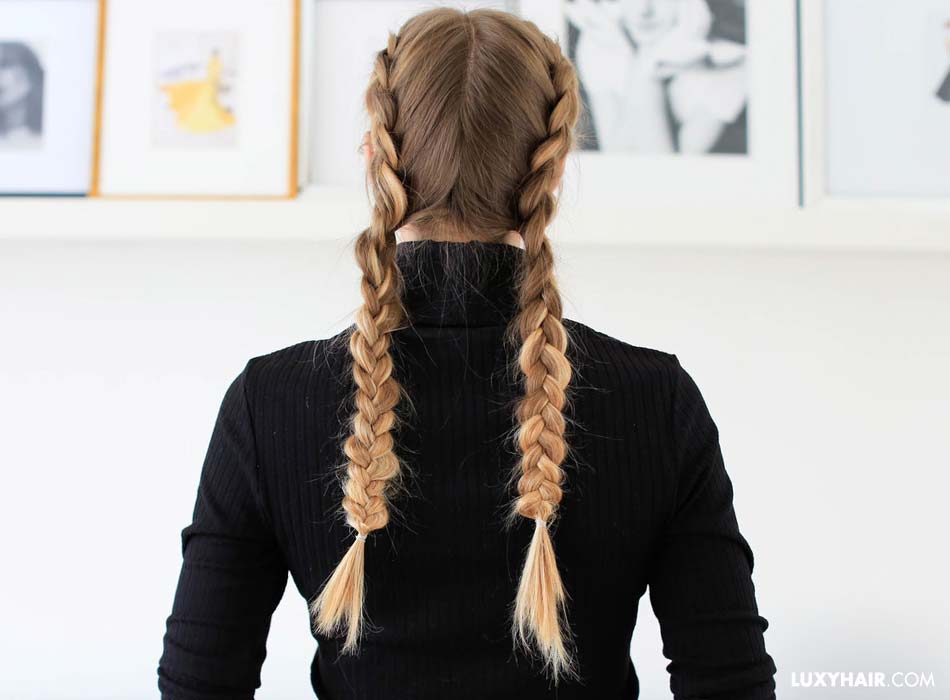
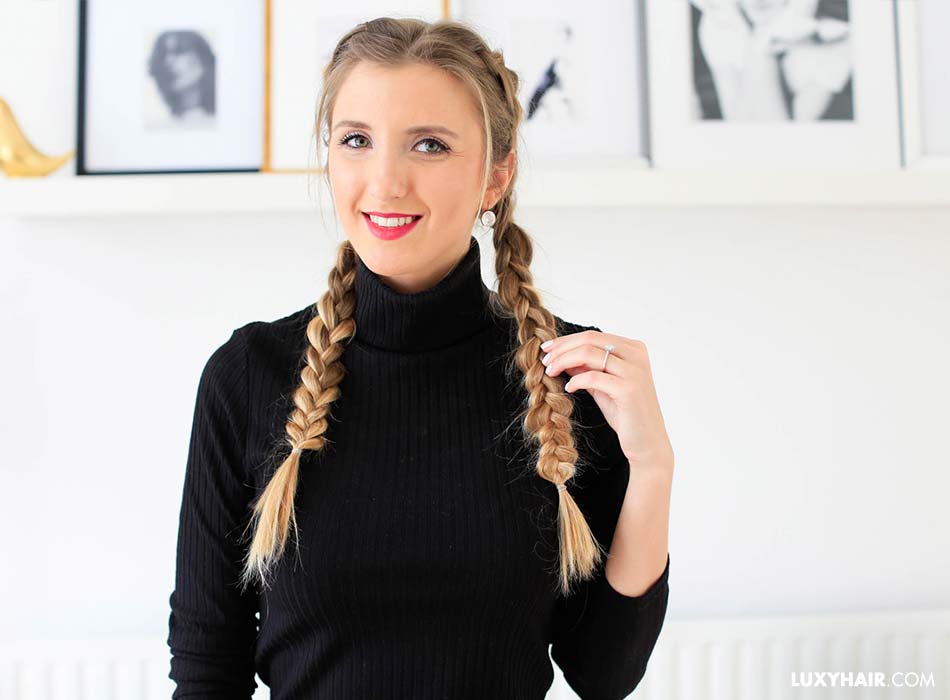
I know a lot of people like to put their baby hairs away but I actually like them for this look because, as I said, I don't want it to be so neat. So I am gonna just get some of them out even more. I feel that pulling out some of your shorter hair here at front, it helps you frame your face better. That's my personal preference. This is the finished look.

Now this is a great look to create when you wear second or third day hair. Another thing I love about this look is that it has a little bit of an edgy and unique feel. You can wear it every day to school or work or you can dress it up and wear it to party and make it a bit more funky. I would love to see your recreations, so please make sure to share your photos on Instagram with hashtag Luxy Hair. Thank you so much for watching, wishing you all a great day. Bye.


What we particularly love about this look is that it's great to recreate on your second or third day hair. We also love how edgy and unique it is, and how it can be worn every day for school or work. It can even be dressed up for a party. That's how versatile it is!

If you recreate the Double Dutch Braid, please be sure to share it with us! We'd love to see how you style it up. 

SHOP LUXY HAIR EXTENSIONS

Double dutch braids tutorial

Double dutch braids tutorial

Double dutch braids tutorial

Shop the look

Application Kit

$20

Luxy High-Gloss Smoothing Conditioner

$12
Quiz: which hair extensions are for me?

This site uses cookies to ensure you get the best experience. Learn more.

Your Shopping Bag

Your cart is empty.

Virtual Try-On

Virtual Color Match

TRY ON HAIR EXTENSIONS

We know the paparazzi can be a pain. Confirm your consent to having your photo taken below.
The Virtual Try On and Virtual Color Match tools may collect, capture, store, use, receive or obtain a photo image of your face and use that image and data for the purpose of providing you with a personalized experience.
Any photo image or data you share will not be disclosed to any third-party or stored on any server or system after your use of the Virtual Try On or Virtual Color Match tool and is not used for identification purposes.
I consent to the use of a photo of my image as described in the Virtual Try On and Virtual Color Match Information Notice and agree to all terms, including data retention, data deletion, and data use, processing storage and transfer. I agree to the Terms of Use and Privacy Policy for Beauty Industry Group and Its Affiliated brands.
Wanna try before you buy? Experiment with colors, volume, and length without the workout of an actual dressing room.

OR

Prefer to save the big reveal for IRL? We got you!
*Seasonal colors and collections may not show up in your color match and may not be available in all lengths and application methods.

Oops! The photo didn't work. Let's try again.

TIPS
The image size must be a minimum of 320 x 620 pixels and a maximum of 1700 x 3500 pixels.
The image size must not exceed 20 MB.
Position yourself in frame from the waist up
Pull your hair to the front and avoid tucking it behind your ears
Natural lighting is best, ideally in front of a window
Tilt your head slightly forward
Ensure your clothing contrasts with your hair color
Wear your hair straight for best results
No filters or edited photos
Avoid harsh sunlight on your hair and face

Results may vary depending on the quality of photo.

We asked the paparazzi for their top tips to the perfect photo.

Do VCM Thumbnail
Do
Don't VCM Thumbnail
Don't
TIPS
The image size must be a minimum of 320 x 620 pixels and a maximum of 1700 x 3500 pixels.
The image size must not exceed 20 MB.
Position yourself in frame from the waist up
Pull your hair to the front and avoid tucking it behind your ears
Natural lighting is best, ideally in front of a window
Tilt your head slightly forward
Ensure your clothing contrasts with your hair color
Wear your hair straight for best results
No filters or edited photos
Avoid harsh sunlight on your hair and face

Results may vary depending on the quality of photo.

Share a photo of your current hair

Do VCM Thumbnail
Do
Don't VCM Thumbnail
Don't
TIPS
The image size must be a minimum of 320 x 620 pixels and a maximum of 1700 x 3500 pixels.
The image size must not exceed 20 MB.
Position yourself in frame from the waist up
Pull your hair to the front and avoid tucking it behind your ears
Natural lighting is best, ideally in front of a window
Tilt your head slightly forward
Ensure your clothing contrasts with your hair color
Wear your hair straight for best results
No filters or edited photos
Avoid harsh sunlight on your hair and face

Keep your chin up and face straight ahead.

Do not Picture

Choose Color

TITLE
TITLE
TITLE

Choose Collection

Seamless
Classic
Halo

Choose Volume

Natural-Looking
A Little Extra
Full Blast

Choose Length

12 INCH
16 INCH
20 INCH
24 INCH

Results may vary depending on the quality of photo.

*Seasonal colors and collections may not show up in your color match and may not be available in all lengths and application methods.
Do not Picture

YOUR COLOR OPTIONS

Still not sure? You can contact our customer service team for hep with your color match. Contact Now
Do not Picture

Your color match is

CHOOSE COLLECTION

Seamless Hair Extensions
SELECT
Classic Hair Extensions
SELECT
Halo® Hair Extensions
SELECT
Clip-In Ponytails
SELECT
Clip-In Buns
SELECT

Compare Methods

Do Picture

Test

APPLICATION
LENGTHS
PER PACK
BEST FOR
Seamless Collection VCM

SEAMLESS

APPLICATION
Clip-ins. Made with a thin, silicone band that lays flat against your head
LENGTHS
12", 16" and 20"
PER PACK
10 pieces
BEST FOR
Thin to medium hair types, suitable for hair past the shoulders
Classic Collection VCM

CLASSIC

APPLICATION
Clip-ins. Made with a fabric-stitched band that adds extra volume at the root
LENGTHS
16", 20" and 24"
PER PACK
10 pieces
BEST FOR
Medium to thick hair types, suitable for short hair to long hair
Halo Collection VCM

HALOS

APPLICATION
Single weft application, secured with an undectable wire and clips. Also comes with two 2-clips for additional blending
LENGTHS
16" and 20"
PER PACK
3 pieces
BEST FOR
Thin to medium hair types, suitable for hair past the shoulders