NEW THINNING HAIR FILL-INS COLLECTION

Psst..we've saved your cart!

But not for long, checkout before it sells out.

← Back
Luxy® Hair  - How To: Feather Loop Braid Hair Tutorial
Hair Extensions

How To: Feather Loop Braid Hair Tutorial

Hi my beautiful friends,

In this video I am sharing how to create this really cool looking braid hairstyle. It's called the 'Feather Loop Braid' and I saw an inspiration picture of this hairstyle on Pinterest. As soon as I saw it, I thought it looks complicated, but I have to figure out how to do it.

So, I did! Once I recreated this braid, I realized that in fact, it's much simpler than it looks. And that's always good news :) I'm super excited to show you guys something new and teach you how to create this braid. Watch the video below for step by step instructions:

Video Transcription

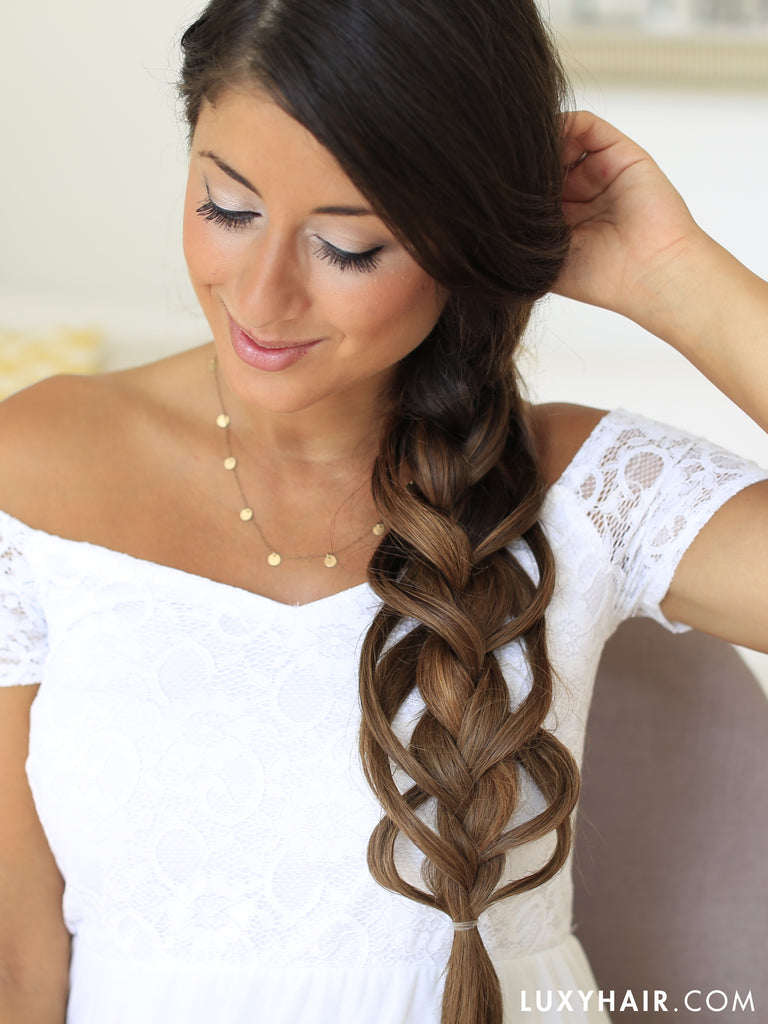
Hello, my beautiful friends. It's Mimi here today and today I'm going to share with you how to create this really cool looking loop feather braid, that's what this one is called. And I saw an inspiration picture of this on Pinterest, and as soon as I saw it, I was like, it looks complicated, but I have to figure out how to do it. So I have, and I've created it. In fact, it's very simple, even though it might look a little complicated. So I'm super excited to show you something new and teach you guys how to create this braid. Are you guys ready?

Let's get started. All right, I don't know if you can tell, but my hair is sort of wet, so I sprayed some water in my hair, but I didn't spray any on my bangs intentionally, I'm going to separate them. So, I'm just going to take a bobby pin and pin them in the back like this, and then I'm going to brush the rest of the hair.

So for this braid to work, I definitely recommend spraying some water in the hair, but also I'm going to be working with hair wax because hair wax will help the hair stay in place as I'm going to be braiding it. So, quickly going to give my hair a brush and I'm wearing my ombre-chestnut Luxy Hair extensions in 160 grams [inaudible 00:01:25]. All right, so once the hair is brushed, I'm going to take a clear little hair elastic and put it right at the base here on the left. So I'm just going to be braiding on the side obviously so that you guys can see what I'm doing. But you can do this braid in the back of your head, you can just do a small section in the back or all of the hair in the back as well. So, just going to put this into a hair elastic, like that.

All right, so next I'm going to do is start braiding. Once I have my hair in a side ponytail, I'm going to brush through it, and then I'm going to separate that section of hair into three equal strands and begin braiding my hair in a regular three-strand braid.

Now I'm going to take this section from the left and release a small chunk of hair from that section, and then I'm going to take a little bit of hair wax and put some hair wax onto that section. Then I will continue braiding the hair, so I'm going to braid that section over the middle section, then take my other section from the other side and release a little bit of hair from there as well, and then add a little bit of hair wax on top. So I'm going to be doing this as I go down my braid. So again, I'm braiding it in. So bringing that section over the middle section, which is essentially doing a regular three-strand braid. Then once I get back on my left side, I do the same thing, I release a small chunk of hair from that main section on the left.

Now here's the tricky part, I'm going to take the first section, so the previous small section that I released previously, add it to the left section and then braid them together over the middle section. Now I'm going to do the same thing here on my right. I'm going to take a small section out, drop it, put some hair wax over it, before I forget it, and then take the previous small section that I released before, braid it into my right section, add it to the right section and braid it over the middle section.

And at this point I can actually go and feather out my loops. As you can see, this will be the method and now I'm going back to my left section, releasing a little small chunk of hair and then adding the previous section into the left section, braiding it over the middle section, and then doing the exact same thing on the right section. So releasing a small chunk of hair, adding some hair wax, and then braiding in my previous section into that three strand braid. And I'm going to go ahead and repeat the exact same steps all the way down my brain.

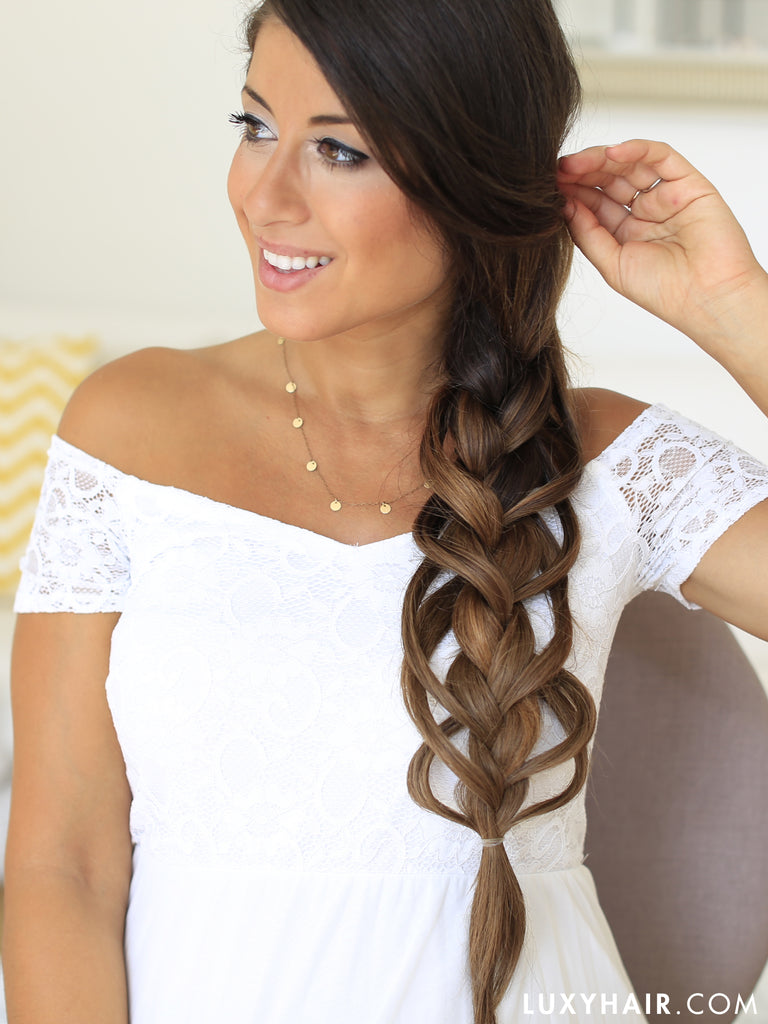
Now, as I get to the bottom of my hair, I have my braid ready and I'm just going to now go ahead and sort of feather out all of these loops just to show you the effect that I got with this braiding technique. Then I'm going to grab a hair elastic, a clear hair elastic, and then just secure this braid at the ends and then I'm going to go ahead and fix it up a little more and you can do this at any point.

Next I'm going to grab a pair of scissors and carefully, carefully is the keyword, I'm going to cut through that little hair elastic that I had at the base of my ponytail when I started braiding. All right, perfect. So again, I'm going to go back into my braids, see if I need to fix anything. Also, I'm going to release my side bangs and just re-pin them a little more loosely around my face, and then we are finished.

All right, now you guys know how to recreate this beautiful feathered loop braid, make sure to try it out a few times. I know at first you do it, It might seem a little complicated, so you might need a bit of practice, but just a few times and you'll master it, I promise. And when you master it, make sure to post a picture of your recreation on Instagram with #Luxyhair. I love seeing you guys recreate the hairstyles, so make sure to do that. Also, if you've enjoyed this video, make sure to give this video a big thumbs up, it will totally make my day. Thank you guys so much for watching, big kisses and I'll see you in the next video, bye.

I am wearing my Ombre Chestnut Luxy Hair extensions today to add length and volume to my braid.

luxy hair feather loop braid

If you choose to recreate this hairstyle, be sure to tag @luxyhair on Instagram - we love seeing your recreations and always feature our favorites!

how to braid feather loop hairstyle luxy hair

luxy hair braid hairstyle feather loop

With love,

xx

Mimi

Shop the look

Related Posts See all posts

Quiz: which hair extensions are for me?

This site uses cookies to ensure you get the best experience. Learn more.

Your Shopping Bag

Your cart is empty.

Virtual Try-On

Virtual Color Match

TRY ON HAIR EXTENSIONS

We know the paparazzi can be a pain. Confirm your consent to having your photo taken below.
The Virtual Try On and Virtual Color Match tools may collect, capture, store, use, receive or obtain a photo image of your face and use that image and data for the purpose of providing you with a personalized experience.
Any photo image or data you share will not be disclosed to any third-party or stored on any server or system after your use of the Virtual Try On or Virtual Color Match tool and is not used for identification purposes.
I consent to the use of a photo of my image as described in the Virtual Try On and Virtual Color Match Information Notice and agree to all terms, including data retention, data deletion, and data use, processing storage and transfer. I agree to the Terms of Use and Privacy Policy for Beauty Industry Group and Its Affiliated brands.
Wanna try before you buy? Experiment with colors, volume, and length without the workout of an actual dressing room.

OR

Prefer to save the big reveal for IRL? We got you!
*Seasonal colors and collections may not show up in your color match and may not be available in all lengths and application methods.

Oops! The photo didn't work. Let's try again.

TIPS
The image size must be a minimum of 320 x 620 pixels and a maximum of 1700 x 3500 pixels.
The image size must not exceed 20 MB.
Position yourself in frame from the waist up
Pull your hair to the front and avoid tucking it behind your ears
Natural lighting is best, ideally in front of a window
Tilt your head slightly forward
Ensure your clothing contrasts with your hair color
Wear your hair straight for best results
No filters or edited photos
Avoid harsh sunlight on your hair and face

Results may vary depending on the quality of photo.

We asked the paparazzi for their top tips to the perfect photo.

Do VCM Thumbnail
Do
Don't VCM Thumbnail
Don't
TIPS
The image size must be a minimum of 320 x 620 pixels and a maximum of 1700 x 3500 pixels.
The image size must not exceed 20 MB.
Position yourself in frame from the waist up
Pull your hair to the front and avoid tucking it behind your ears
Natural lighting is best, ideally in front of a window
Tilt your head slightly forward
Ensure your clothing contrasts with your hair color
Wear your hair straight for best results
No filters or edited photos
Avoid harsh sunlight on your hair and face

Results may vary depending on the quality of photo.

Share a photo of your current hair

Do VCM Thumbnail
Do
Don't VCM Thumbnail
Don't
TIPS
The image size must be a minimum of 320 x 620 pixels and a maximum of 1700 x 3500 pixels.
The image size must not exceed 20 MB.
Position yourself in frame from the waist up
Pull your hair to the front and avoid tucking it behind your ears
Natural lighting is best, ideally in front of a window
Tilt your head slightly forward
Ensure your clothing contrasts with your hair color
Wear your hair straight for best results
No filters or edited photos
Avoid harsh sunlight on your hair and face

Keep your chin up and face straight ahead.

Do not Picture

Choose Color

TITLE
TITLE
TITLE

Choose Collection

Seamless
Classic
Halo

Choose Volume

Natural-Looking
A Little Extra
Full Blast

Choose Length

12 INCH
16 INCH
20 INCH
24 INCH

Results may vary depending on the quality of photo.

*Seasonal colors and collections may not show up in your color match and may not be available in all lengths and application methods.
Do not Picture

YOUR COLOR OPTIONS

Still not sure? You can contact our customer service team for hep with your color match. Contact Now
Do not Picture

Your color match is

CHOOSE COLLECTION

Seamless Hair Extensions
SELECT
Classic Hair Extensions
SELECT
Halo® Hair Extensions
SELECT
Clip-In Ponytails
SELECT
Clip-In Buns
SELECT

Compare Methods

Do Picture

Test

APPLICATION
LENGTHS
PER PACK
BEST FOR
Seamless Collection VCM

SEAMLESS

APPLICATION
Clip-ins. Made with a thin, silicone band that lays flat against your head
LENGTHS
12", 16" and 20"
PER PACK
10 pieces
BEST FOR
Thin to medium hair types, suitable for hair past the shoulders
Classic Collection VCM

CLASSIC

APPLICATION
Clip-ins. Made with a fabric-stitched band that adds extra volume at the root
LENGTHS
16", 20" and 24"
PER PACK
10 pieces
BEST FOR
Medium to thick hair types, suitable for short hair to long hair
Halo Collection VCM

HALOS

APPLICATION
Single weft application, secured with an undectable wire and clips. Also comes with two 2-clips for additional blending
LENGTHS
16" and 20"
PER PACK
3 pieces
BEST FOR
Thin to medium hair types, suitable for hair past the shoulders